Introduction
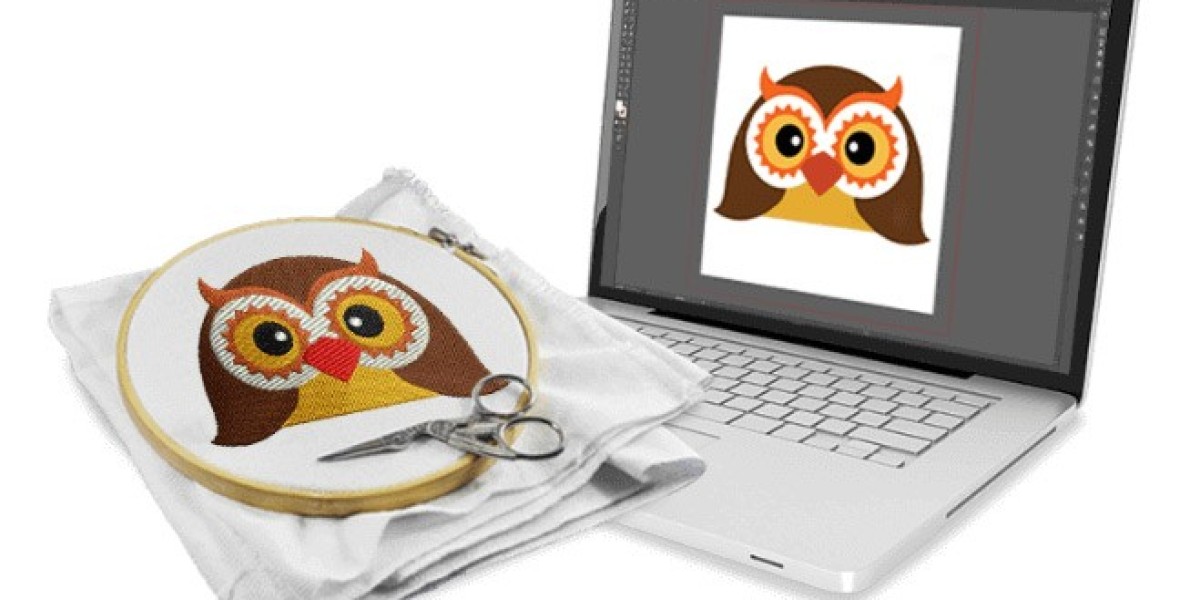
You have a beautiful JPG on your computer. Maybe it is a logo for a small business, a cute cartoon for a kid’s backpack, or a fancy monogram for a towel. You want to stitch it out on your embroidery machine, but you have no idea where to start. I have been right where you are. You hit that auto-convert button, cross your fingers, and hope for the best. Then the machine starts sewing, and you watch in horror as the thread tangles, corners turn jagged, and smooth curves look like tiny staircases. Frustrating, right? The good news is you do not need to be a professional digitizer to fix this. When you learn how to properly Convert JPG to VP3, you take control of every single stitch. In this guide, I will walk you through simple, human-friendly tips to keep your stitches clean, smooth, and totally machine-ready.
Why Your JPG Does Not Magically Become a Perfect VP3
Let me clear something up right away. A JPG and a VP3 file speak completely different languages. Your JPG stores millions of tiny colored pixels. Think of it like a mosaic made of tiny squares. Your VP3 file, on the other hand, stores actual stitch commands. It tells your embroidery needle exactly where to plunge into the fabric, how long each stitch should be, and when to jump to a new location. When you try to convert a messy or low-quality JPG, your software has to guess what you want. And trust me, software guesses wrong a lot. That is why you end up with random stray stitches, puckered fabric, and designs that look nothing like the original picture.
Start with a Clean JPG Before You Even Open Your Software
I know you want to jump right into the fun part, but take five minutes to clean up your image first. Open any basic photo editor. Even free online tools work great. Crank up the contrast so the outlines of your design pop. If your image has soft shadows or faded gradients, get rid of them. Embroidery cannot stitch a smooth fade from dark blue to light blue. You need solid, flat colors. Also, resize your JPG to the exact size you want the final embroidery to be. If you plan to sew a four-inch wide patch, scale your image to exactly four inches wide at about 200 DPI. Do not let your digitizing software do the scaling later. That almost always stretches stitches into loose, floppy loops that snag on everything.
Auto-Digitizing Is Tempting, But Manual Control Wins Every Time
I get it. You see that auto-digitize button, and it looks so easy. One click, and the software spits out a VP3 file. I used to do this too. But after ruining three shirts and wasting a whole spool of thread, I learned my lesson. Auto-digitizing creates choppy, rough stitches. It cuts corners too sharply. It adds random tiny stitches that look like stray hairs on your fabric. It also throws in way too many jump stitches, which waste time and thread. If you want clean and smooth results, you need to switch to manual digitizing. Do not let that scare you. Manual does not mean hard. It just means you tell the software exactly where to put each stitch instead of letting it guess.
How to Place Stitches for Smooth Curves and Sharp Corners
Open your cleaned JPG inside your digitizing software and zoom in close. Start with the outline of your design. Place a stitch point, then move a few millimeters and place another. For straight lines, you can space your points farther apart. For curves, place your points much closer together. Imagine you are drawing a circle with a pen. If you only use four straight lines, you get a jagged square. But if you use many tiny straight lines, you get a smooth circle. Same rule applies here. On sharp corners, put your points exactly on the corner. On gentle curves, space them evenly. Keep your stitch length between 3.5 mm and 4.5 mm for most fabrics. Shorter stitches cause puckering. Longer stitches snag and break.
Do Not Skip the Underlay. Seriously.
Here is a tip that took me way too long to learn. Underlay is the first layer of stitches that goes down before your top stitches. Think of it like the foundation of a house. Without a solid foundation, your whole design sinks and wobbles. For fluffy fabrics like fleece or sweatshirt material, your top stitches will just disappear into the fuzz if you skip underlay. For stretchy fabrics like polo shirts, your design will distort and pull. So always add a light underlay. A simple run stitch along the outline works perfectly for most projects. For stretchy material, use a zigzag underlay. For thick caps, use a double underlay. This extra thirty seconds of setup saves you hours of picking out bad stitches later.
Keep Your Stitch Density in Check
When you convert a JPG to VP3, your software will ask you how dense you want your fill stitches. Do not crank it to the max thinking more stitches equals better quality. Too many stitches packed into a tiny area will make your fabric ripple and pucker. The needle punches so many holes that the material cannot relax. A good rule of thumb is a density of 0.4 mm to 0.5 mm between stitch rows for most cotton or polyester fabrics. For larger designs, you can go even looser. For tiny text, you might go tighter. Always test on a scrap piece of the same fabric first. Run a small sample and look at the back. If you see lots of thread showing through or the fabric looks wavy, lower the density.
Reduce Your Colors Like You Are Packing a Suitcase
Your JPG might have thousands of colors. I have seen images with fifteen different shades of blue that all look almost identical. Your embroidery machine does not want to deal with that. Every time you switch colors, you have to stop the machine, cut the thread, and load a new bobbin. That is fine for five or six colors, but fifteen is a nightmare. Combine similar shades into two or three distinct colors. Grab a thread color card from brands like Madeira or Isacord and pick the closest matches. Here is the secret: your final embroidery will still look beautiful because thread catches light differently than pixels do. The human eye sees the overall shape and texture, not the exact shade number.
Simulate Before You Stitch. Always.
Before you export that VP3 file, run a simulation inside your software. This is like a dress rehearsal for your design. The simulation shows you exactly where stitches overlap, where gaps appear, and where the thread jumps across empty space. Those jumps are called jump stitches. Too many jump stitches waste thread and look messy on the back of your fabric. Watch the simulation carefully. If you see the needle traveling across a big empty area without sewing, go back and reroute your stitch path. Sometimes you can rearrange the order of your colors to make the jumps shorter. Sometimes you can add a trim command to cut the thread instead of dragging it across. A clean simulation leads to a clean stitch-out.
Save a Backup of Your Working File
You finished your design. You exported the VP3 file. You are ready to stitch. Stop for one second. Save a backup copy of your working file in your software’s native format, like .EMB or .PES. The VP3 file is the final output for your machine, but it is not easy to edit later. If you notice a small mistake in the stitches after running a test, you want to go back to your working file, not try to patch a VP3. Trust me, trying to edit a VP3 file directly is like trying to unbake a cake. Keep both files in a folder named by design and date. Six months from now, when you want to stitch the same logo on a different fabric, you can tweak the underlay or density without starting from scratch.
Conclusion
You do not need to be a professional digitizer to get clean, smooth stitches from your embroidery machine. You just need a few simple habits. Clean up your JPG first. Switch from auto-digitizing to manual control. Place your stitch points carefully, especially on curves. Add a proper underlay for your fabric. Keep your stitch density reasonable. Reduce similar colors. Run a simulation. And always save a backup of your working file. I know it feels like extra work at first, but I promise you, every single one of these steps saves you time and frustration in the long run. The first time you pull a perfectly smooth, beautifully stitched design off your hoop and see every thread lying exactly where you wanted it, you will feel like a champion. So take a deep breath, open that JPG, and start tracing. Your embroidery machine is waiting for you to feed it something great.